Pony Anatomy

Hey, mlpdrawingschool peeps, this is my anatomy lesson for the week. I'm not super happy with it at the moment but like an idiot I didn't seek out some of y'all's advice sooner. So, if you can offer me some critique on my lesson here. I know it's rough and there are probably some very unclear parts that need to be clarified. Or perhaps there's some parts I go too in depth with. Perhaps one of my example pictures is too messy to read. Please let me know so I can get this thing fixed up and have it be a nice proper lesson on the same level as the last 5.
 Don't worry I totally have things under control...
So this week's lesson is my job. A bit overwhelming to follow behind Chumpy, Koetsu, and Viw, but I think I can handle it. This week I'll be covering anatomy. So let's start with:
Why does anatomy matter? It's a cartoon, they ignore/stretch/bend/cheat it most of the time anyways?
 Anatomy matters so much, you don't even know!
Anatomy establishes credibility. By that, I mean it makes the viewer believe what he is seeing isn't a collection of lines and colors, but an actual pony. This is why it's so jarring when the anatomy is done incorrectly. Anatomy is normally sort of an unsung hero (there are plenty of exceptions though), in that if the artist does it right so that you don't notice it.
As for the whole "It's a cartoon" thing, I'll just quote the recent Q&A with Andy Price (artist for the official MLP comic)
"The notion here is that you have a foundation of what it is you are distorting... even if it is Wacky and crazy, the perspective, foreshortening and motion is correct. It gives an anchor for the viewer. ...an artist with a better knowledge of how a figure is constructed will have a greater advantage, I think, for distorting and contorting that figure than an artist who does not have that knowledge. "
Alright so that's why anatomy's important. Now with that out of the way, we can move on to actually learning the anatomy.
Anatomy of The Pony
So when I talk about anatomy, I'm not really talking about in-depth knowledge of all the muscles and organs of a pony. While such in-depth knowledge is useful, it's a bit overkill for this guide. I would however recommend looking at some pictures of actual horse anatomy such as this skeleton here:
This is especially helpful in learning the position of joints and how they bend. We'll get to that later on down. Let's go grab a reference like this one:

Now that we've got our reference, let's start with a simple undersketch.
 Now wait just one second, didn't we already have a guide for sketching?
If you haven't already read chumpy's sketching lesson here, I recommend it.
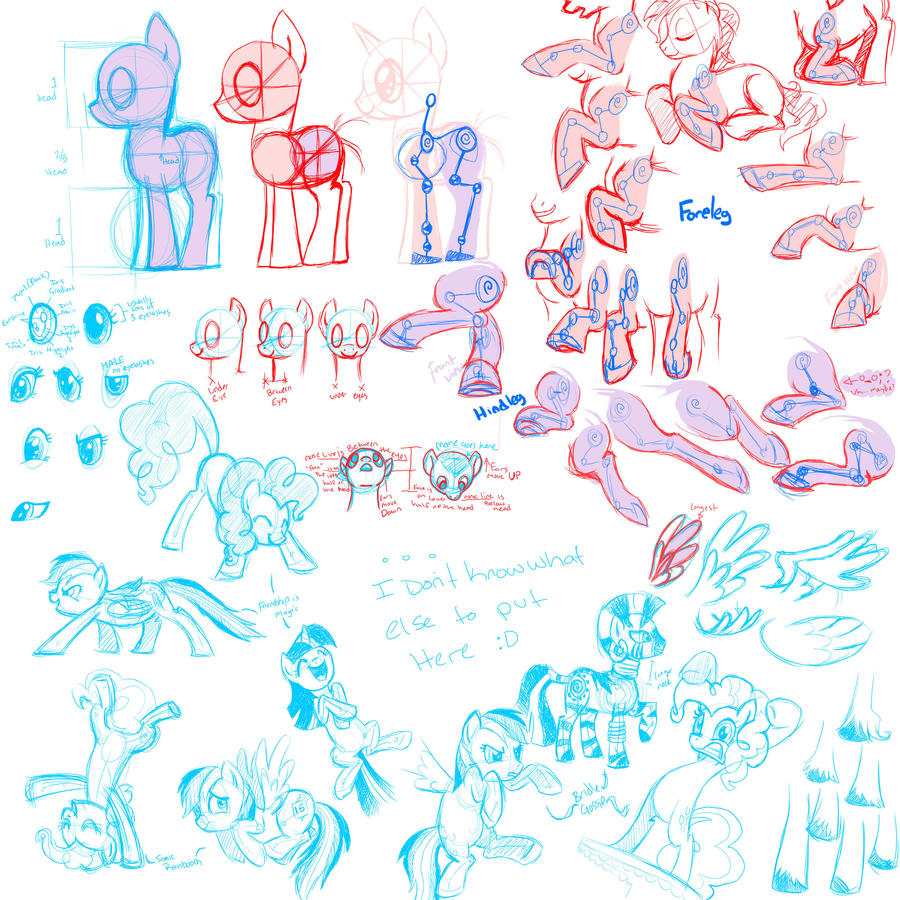
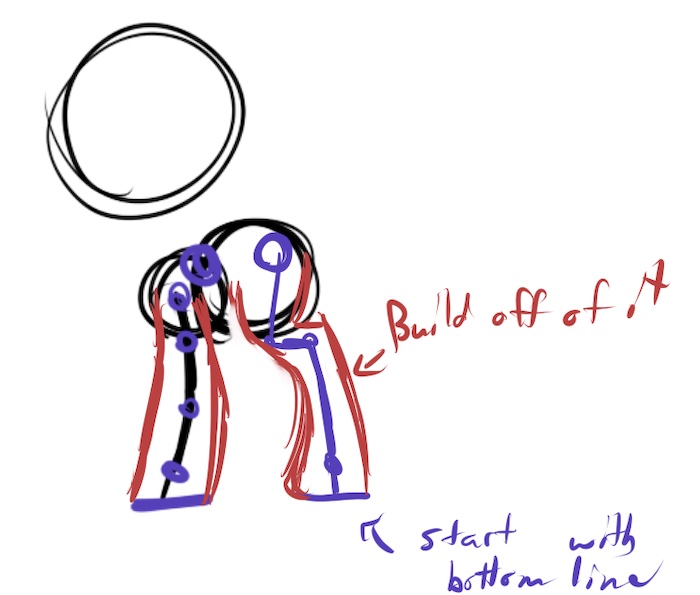
Now a show style pony is fairly simple in it's construction. First we start with some guide circles and a skeleton:

Note that the two circles making up the body overlap. Now while you're drawing this, it'd be more helpful in the long run not to think of those circles as circles but as three-dimensional spheres. This'll help you out when you need to draw a pony in a perspective there isn't a reference for.
Next, I'm going to go in-depth into each part of the body and how it's constructed.
Assignment #1
Draw a pony under sketch based on a reference from here.
Legs
This is one of those areas most new artists have serious issues with and most of the time it's because they don't understand the bone structure underneath the legs. Let's go back to a show reference and overlay a skeleton to help out:
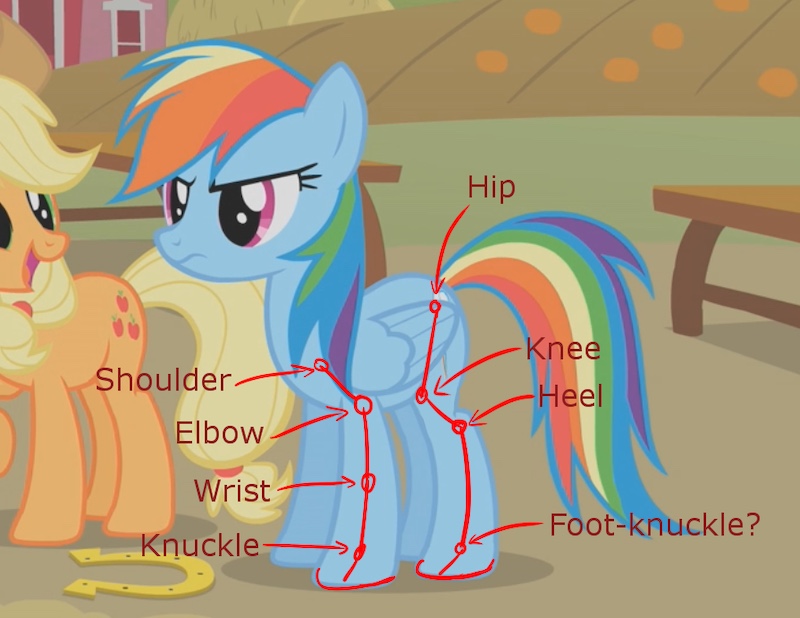
Really pay attention to the joints, the distance between them, and the directions they bend in. Now as for how to draw the legs there's some key guidelines to pay attention to.
Make sure when drawing the skeleton that your legs aren't straight. Pony legs are never totally straight, they're always a bit bent to keep the pony from looking really stiff and not dynamic.
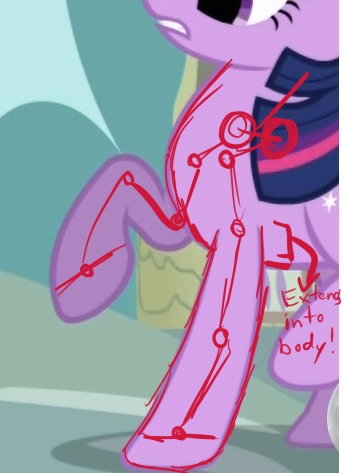
Now the forelegs are relatively simple. When straight, they're just a pair of curves that spread further away approaching the hoof. When bent, it get's a little more complicated, but you shouldn't have many issues as long as you keep the joints (and the distances between them) in mind. Make sure to keep in mind that the legs do extend into the body to show that the two are connected!
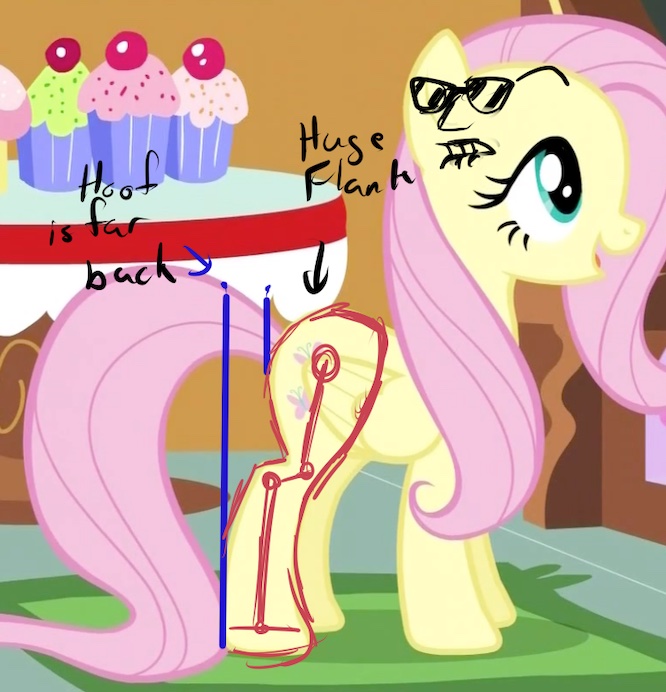
The hind legs on the other hand can be a bit more bothersome. They curve out pretty far. In fact, in a standing position the hind legs will extend out beyond the rump so that the hind hooves are the furthest back part of the pony. Notice that little notch in the hindlegs? That's actually not just some random detail, but a joint! Now while the hind legs joints don't form a nice simple curve like the forelegs, just keep in mind where those joints are at and you should be fine.
So now you've got the leg skeletons all nicely plotted out. What do you do next? Well you add some meat to those bones! Now, I don't have an exact method for this, but keep in mind pony legs are pretty thick. I generally start with the bottom of the hoof to establish the width and then I build around the skeleton like so:
Body
As I mentioned earlier, the body of a pony is just two overlapping circles:

The amount they overlap varies depending on the perspective. This is where you have to use your imagination to sort of turn the camera a bit.
For example, this picture shows a comparison between the show's standard side and ¾ perspective on the bodies:
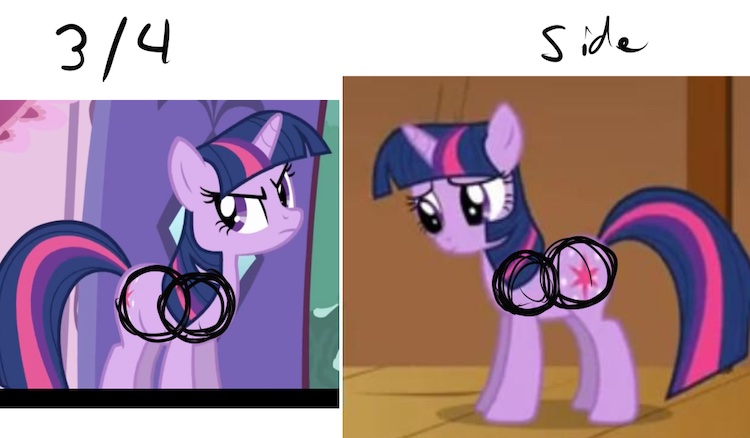
A common issue new artists have with the ¾ shot or similar shots that are in between the side and front shot is that they don't adjust the amount of overlap to compensate for the perspective. That adjustment is called foreshortening. Without it, the body winds up looking way too long.
 Oh my, what a lovely cowboy weiner dog!
 It was supposed to be Applejack...
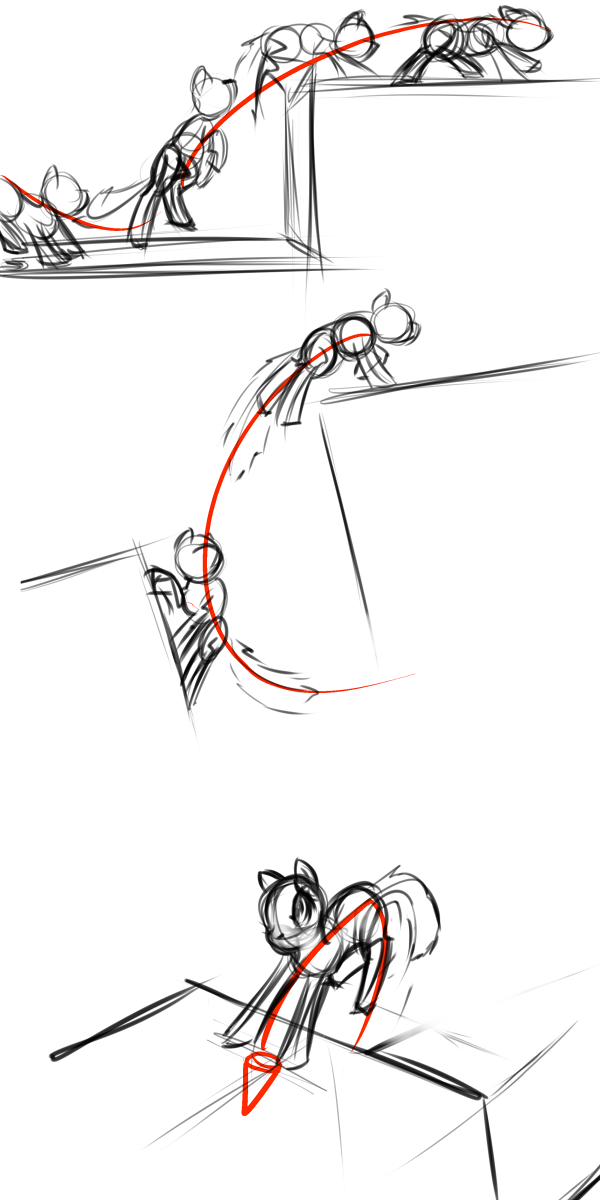
Now the spine is another thing many new artists don't pay attention to. Note that it does have curve in it, for example:
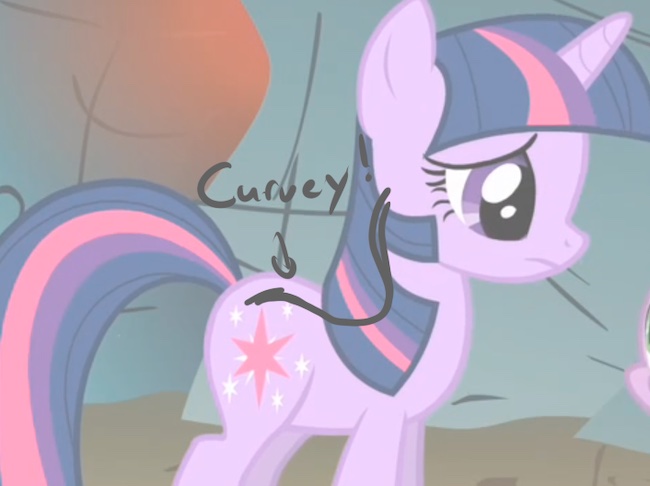
That curve is real important and without it, your pony will look like they have a steel rod for a spine, which looks very stiff and uncomfortable. It's also noteworthy that a pony's spine is almost always going to be the same as your line of action. Here are a few line-of-action examples from Koetsu:

In the show, the front shot of a pony body actually cheats the perspective so we can still see a bit of the rump. Luckily, this shot isn't used much as horses from the front are just weird looking.
Because of the perspective cheat, the undersketch is going to be a bit different:
I only use one body circle and then just add on the little hind leg bit by eyeballing the difference in angle from the single body circle. I wouldn't recommend using the front body shot unless you have to as, again, horses from the front look weird.
Head
Pony faces are really complicated so I'll have to break it down into even smaller bits.
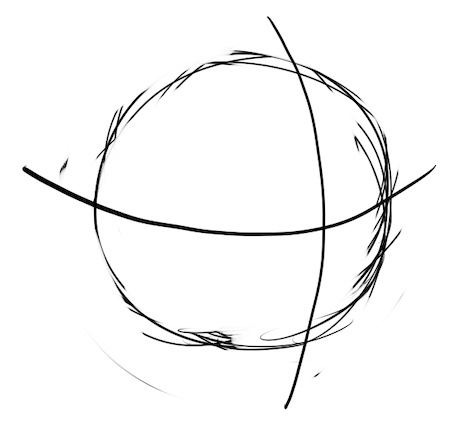
So we start with our sphere with some guidelines to show where the center of the face will be:
I then block out my eye positioning like so:
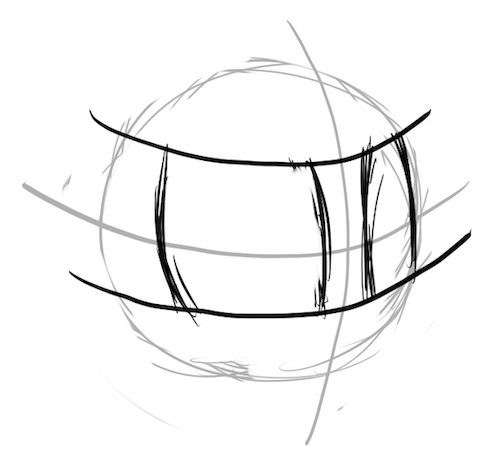
This'll help keep my eyes lined up and the same size. Note that pony eyes are really big. They take up the majority of the space for the face.
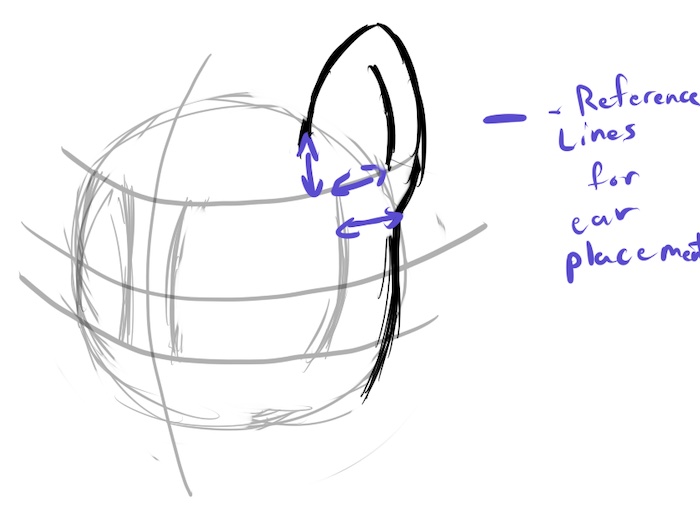
Next I'll use where I blocked in my eyes for reference to position the ears:
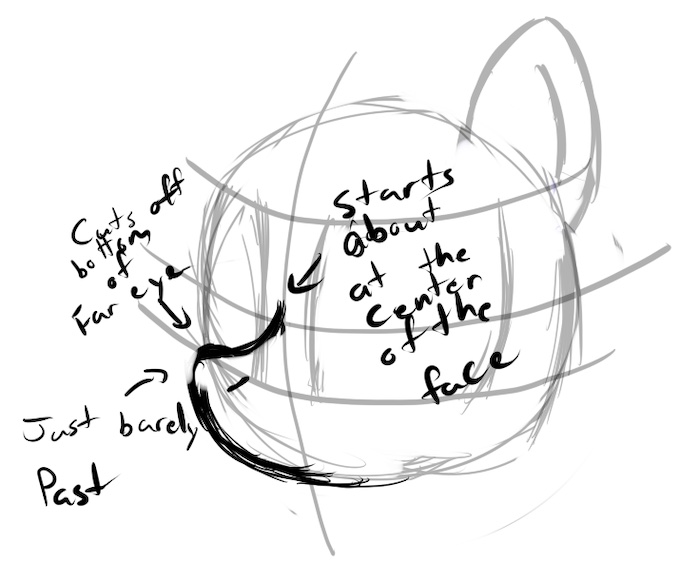
Then the muzzle which starts up in between the noses (blocking the bottom of the far eye from view) and just barely comes out past the face:
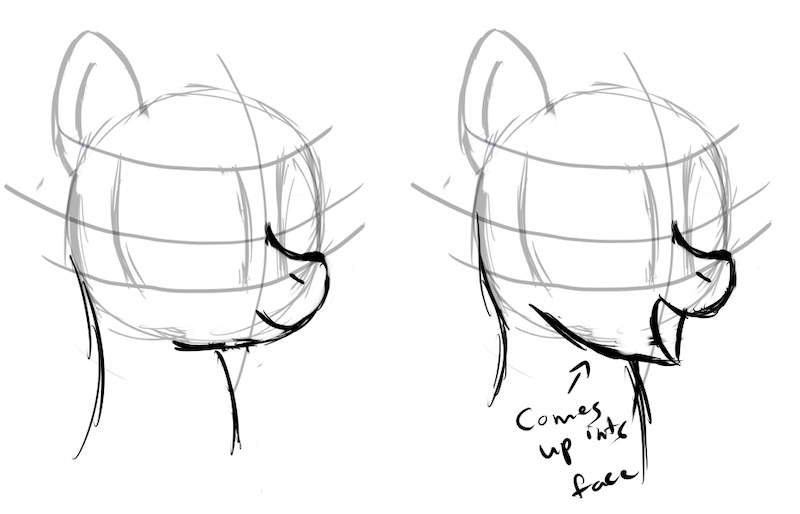
It's important to note that if your pony's mouth is open the jaw is going to lower and it'll curve up into the face while if it's closed the jaw is much more flat:
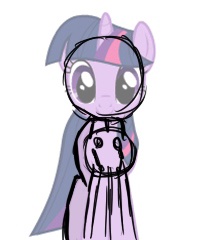
If your pony's a unicorn, the horn comes out from the head at a 45 degree angle (which is unfortunately skewed due to foreshortening in a ¾ shot) from the center of the circle and is lined up down the center of the face like so:

This face specifically is the ¾ shot which is the most versatile, offering plenty of emotion while avoiding that creepy human face issue the front shot has.
Here's a study that breaks down the face and side shots. Thankfully, they're much simpler to draw.
Eyes
Eyes are pretty complicated all by themselves but I'll cover the gist of it. There are lots of styles of eyes Example. It's very important when drawing a pony to use the right eye style. It won't look like Fluttershy if it's got Dash's eyes.
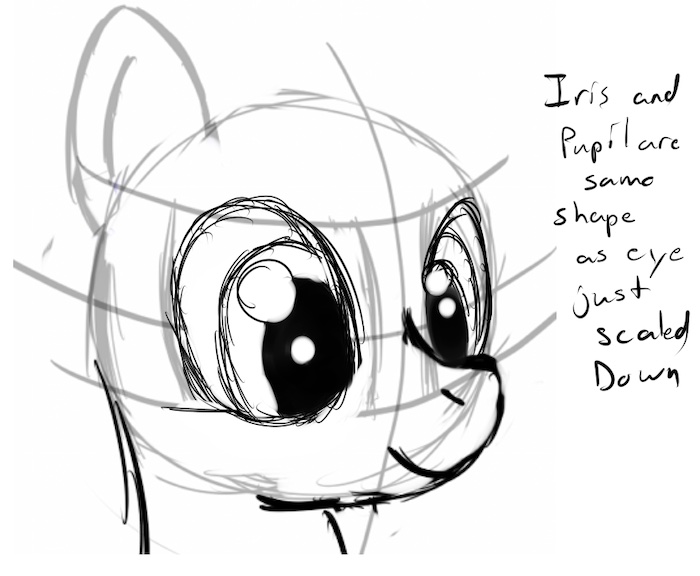
The eyes are built as an ellipse, with the iris and pupil being the same shape just scaled down:
It's important to note that the iris and pupil tops and bottoms should line up with the other eye just like with the rest of the eye unless you're drawing Derpy.
Eyespots are super important!

Without them, you're pony has eyes like the titular creature of Jaws.
 lifeless eyes. Black eyes. Like a doll's eyes.
Wings
Now wings are something that always gave me trouble, and the reason why was that I wasn't constructing them correctly. You see wings are just like the legs (well the bones are a bit different but it's still very similar). Here's what I mean:
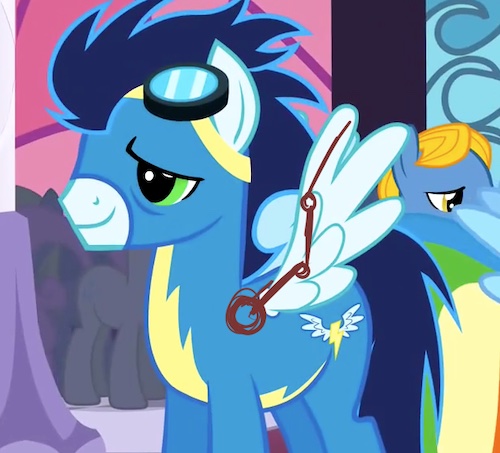
So if you're drawing a pegasus, you should probably include this wing bone in your skeleton.It helps a ton!
Now the show style wings aren't actually all that wing like, they're more like hands.
 Hands? But one of the best things about drawing ponies is not dealing with hands!
Those feathers are more like sausage-y fingers. I find that the best way to get the contours of the feathers correct is to pay attention to the negative space around them. What's negative space? Well it's looking at the shapes that exist in between the edges of objects.
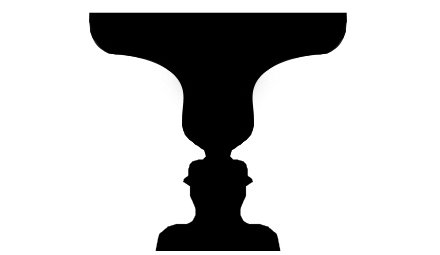
Look at this chalice, the negative space around it creates shapes that look like to human profiles!
So how do we do this with wings? Rather than drawing the edges of the feathers, try to draw the edges of the shapes created in between the feathers.
Conclusion
The best way to learn pony anatomy is to do a study. To do that, go over to here or go watch the show and take screenshots, whatever, just go grab some show references and try to recreate them with this process.
However I should mention that just copying a reference isn't going to make you a good artist. Start out sticking close to the reference until you've figured out the pony anatomy, then it's time to start moving away from them (Don't get rid of them completely!) and create your own unique pony pictures and poses!
Assignment 2
Draw a pony in a pose that doesn't have a 100% perfect reference for it!
Additional Links
The Common Anatomy Errors guide includes a lot of miscellaneous info on parts of the pony that is super useful for getting all the proportions right.
An Imgur Album of Various Pony Anatomy Studies/Guides You Might Find Useful
Vertrev's Pony Study is an excellent example of how the leg joints in a pony: