
Earlier a new artist, Leo986, gave me the idea of doing this after they said that they don't understand undersketches, even though they read the Anatomy and Undersketching guide. So, What better way to explain than to show?
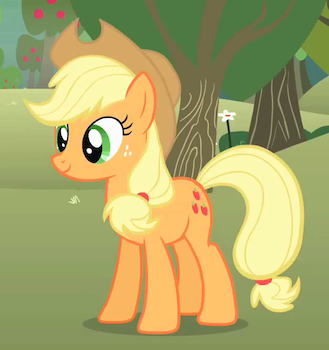
We're using this Applejack as reference:
I'll go through each image and explain the basic steps I took in detail.
Let's get started! Pencils and paper ready, everypony!
The Circles
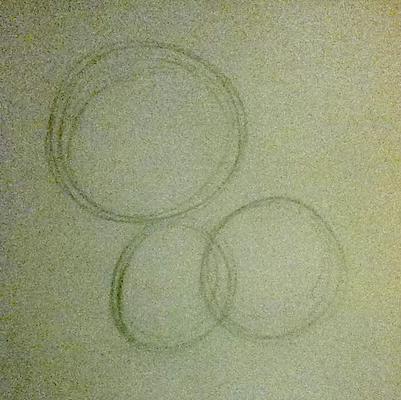
 Easy-peasy.
Here, we have a circle. This will be the head. You will measure a lot of the pony from this one circle, so make sure it's an appropriate size to work with. You'll notice it's accompanied by two smaller circles. The one just below the head circle is the chest circle, and the one further back and slightly larger is the rump circle.
- Measure the size of the chest circle with the head circle; you should find that it's about 2/3 the head circle.
- The top of the rump circle should also be about in-line with the bottom of the head circle. Go ahead, measure it again.
- Notice how both circles overlap. The body is a lot smaller than you think. The width of both circles together should be about 1 1/3 the head circle, so measure once more to make sure.
The Body
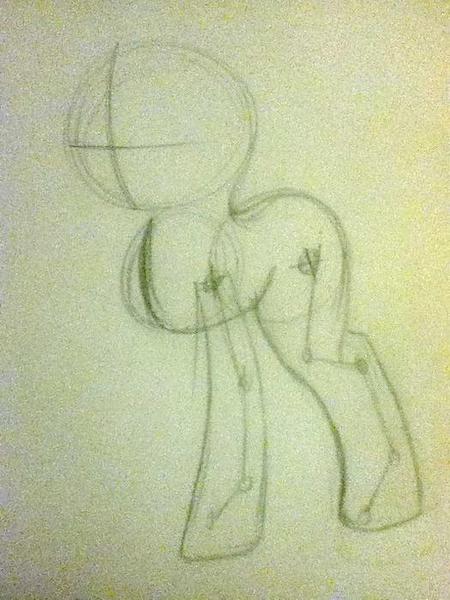
 Ah'm followin' so far...
Here, you join those circles, and create an outline of the body, specifically the neck/chest and the back/rump. Look at the chest. It's pretty far in from the chest circle, right? The circles are not absolute shapes to go from. Change whatever needs changing.
Here's where you start to draw the legs. Again, measure by that head circle; The legs are surprisingly close to body length, at 1 1/3 head circles. My back legs are pretty stylized, as you can judge from the reference, so don't take this as the absolutely correct way to draw them. Notice how the legs are pretty long and the body is pretty thin; I don't care. Neither should you. Right now, I just care about them being in the right place.
Also notice how I drew the closer two legs instead of the front two/rear two. More often than not, this pairing will be on the same/similar planes. I call these the 'foreground legs'. A good way to remember this is to look at a pony from the show; The further legs, or at least the further rear leg, will be slightly shaded.
Refining the Body

 Uh, yeah, Ah'm still with ya...
- (1) Do you see that line? Yes, the one running through the arm. A lot of you are drawing the leg and then drawing the chest and stomach as separate lines. This is just... it's wrong. Draw that line right through the leg. Why? Because drawing the lines separately leads them to look separate, as if the body's ribcage is broken. Visualize the chest behind the leg, faze the leg out of view, look though it. It's just one curve.
- (2) I've said the body was too thin and the legs too long, so I changed them. How did I see this? I put my pencil down, and I looked. I stared at my piece as a whole. When you're drawing you tend to get lost in the little space your currently working on, and so the whole composition is thrown off. This is the main reason new artists' pieces look 'wrong' or 'off'. Stop, take a step back and assess the piece so far. It will save you either a lot of time and effort later, or a lot of grief. either way, it's a bonus.
So what do we have so far? We've almost got a basic pony! Just one leg... I hate that leg. The far rear leg. I despise it so. But wait! How do we know it's fine to move on? That's right; We measure! That head circle is still clearly visible without any annoying ears or muzzles in the way, so let's use it again. Everything seems to check out, so let's move on to the face.
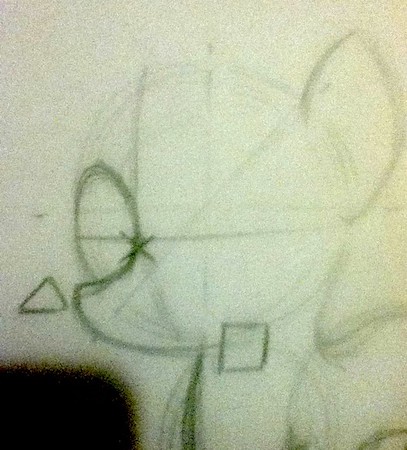
Head: The 'Cross'

 That's not helpful!
The 'Cross'. Used mainly for placing the muzzle, eye and ear in side-view, but this is 3/4 view! Why is this artistic noob giving me irrelevant advice? Because, it's not irrelevant. No, you can't use this to place the muzzle or eye, but the ear can still be placed. Pretend this is a compass, the ear normally joins at points NE and E, so let's try that.
Head: The Ear
 What.
What.There's nothing to really measure the ear against - Or is there? The points. Draw a line from point NE straight to the right, and a line from E straight up. the lines will cross, but keep going. use this middle point as a kind of mirror, and copy the length passed the intersection. That's complicated! Sorry, look at the ear, you'll see what I mean. The top point is directly above E and the furthest part of the curve is directly inline with NE.
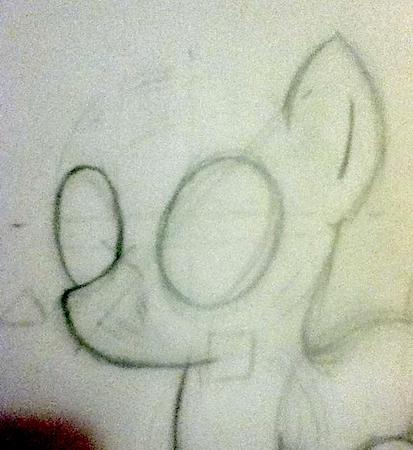
Head: The muzzle and far eye
 Ah know this part! Easy-peasy, like Ah said!
Look at the image first. Okay, had a look? Just under where the horizontal and vertical face-lines meet, I've drawn an 'X'. This is the start of the muzzle. Start here if you're not already doing that in your drawings. ALWAYS. then curve to 'Triangle', and then to 'Square'. This muzzle is pretty poor and I correct it later, but this is the general shape. Experiment. That eraser's not going to sit there.
Starting back at the 'X', make a really oval-like curve up, round, and down. As faces turn, on anything, the further eye is always squished, thinned, while the closer eye is more round. Normally, such as when drawing people, you start with the closer, rounder eye, but for ponies I generally find this way easier. Keep the thinness in mind! I mean thin! Look at the reference again, it's super thin compared to the other eye. Like the muzzle, I fix the eye later, and I make it slightly thinner than this.
Head: Closer Eye
 Teach us correctly! You're confusin'!
This eye is simple, yet complicated. I don't exactly know how to explain this eye. It's generally lower than the further eye in the show, but I like to draw them level. This helps me find it's size, already knowing it's height and that it's supposed to be much thicker and rounder than the other eye, but it's merely how I approach the eyes. What definately happens, though, is that the bottom of this eye always falls beneath the tip of the muzzle. Get a ruler or something, make it horizontal and check If that's correct in your piece.
Notice how it's an oval, and it's tilted backwards towards the ear. There are certain differences, like between Rarity's eye and Applejack's, but this 'leaned-oval' style is true to pretty much every pony in the show.
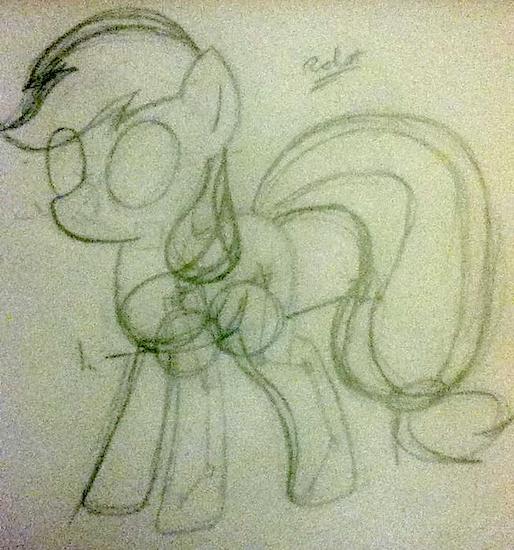
Hair placement
 Pfft. So hard.
Quickly make the general shape of the head mane/neck mane/tail. Just the vague shape of it, don't bother with the little points yet. Get the general shape down. Look at Reference Applejack's neck mane; she has a silky, curvy, almost triangular neck mane while mine is a quick triangle-circle hybrid shape. Also the little points that curve round so awesomely aren't even in my shape. I've noted the points in the tail with little lines, though, while still keeping that basic round shape. The head mane stands too tall here, and the tail sticks out way too far and it overall quite bulky, but again, I took a step back and I noticed these things, and I fixed them. And now, after sketching, stopping, looking, erasing, sketching some more, erasing some more until I was satisfied, we arrive at my last image.
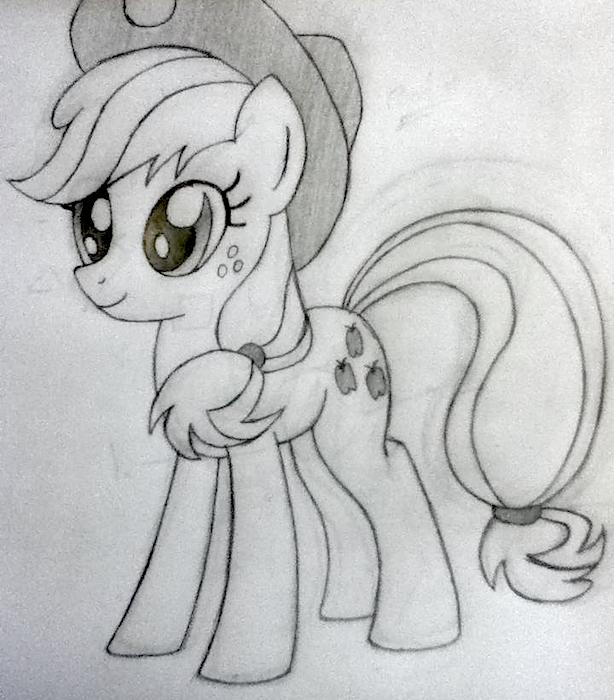
Refinement and Cleanup
 Get out'a mah head!
Stop right there, I think I know exactly what you're thinking; How did you go from the last step to this one? It's such a massive leap! No, it's not. Look back at the last step; All this is is a cleaner version, with the erasing/sketching I was talking about. I thought the tail was too bulky, so I trimmed it down. The hooves here angled strangely like she was standing on a hill, so I flattened the bottoms out. The haunches were really short and the flank came down really far, so I raised the hock (that little point at the back of the leg) to stomach-level. I added the little points and lines in her mane/tail. It is not as big a leap as you think. That far rear leg still looks wrong, but I just hate that leg with a passion. The rump looked way too high, so I moved it down and in turn had to erase the whole refined tail and redraw it a little lower - no big deal. It looks correct now. The piece looks correct, anatomically and proportionally. All thanks to the undersketch and me stopping and taking a look at my piece every now and then.
 And Ah didn't learn a thing!
Well, there you have it. This is my demonstration of the undersketching guide through my own unique style. I hope you gained a better understanding of undersketches and planning a piece as a whole, and I also hope it will reflect in your future pieces.