It came up recently that some of our first-time artists don't know how to use their pencil to measure angles and compare body parts, and don't know what an undersketch is or how or why to draw one. So here is a comprehensive guide to that stuff to help new artists get started from the very basics. I originally wrote this as two comments, but I've combined them and done some editing here so this can be used as a tutorial by everyone.
 I'm gonna do this in excruciating detail so that, even if you know some of this stuff, it might help someone who has never seen how to do it before.
 Starting from the baseline never hurt, and even if you are experienced, maybe you will pick up something you didn't consciously know before.
How to measure and compare
Bring up your reference. (You are using a reference, right? If not, go get one. I'll wait. You should always have your reference handy.) Sit back from your screen a bit. Choose two parts of the pony to compare. Things I commonly compare include:
- the length of a leg to the height of the head
- the height of the ear to the height of an eye
- the length of the muzzle that's past the circle of the head with the length of the muzzle that's overlapping the circle of the head (this one compares lines instead of body parts, though)
- the height of the hair to the width of the flank
- many many many other combinations
 Compare ALL the things!
By comparing two things that aren't near each other, you will make sure that things are proportional across your drawing. By comparing two things that are near each other, you will make sure things are proportional locally. Ideally you are looking for things that should be the same width, but sometimes you can look to see how much bigger or smaller something is.
Hold your pencil sticking out of the top of your fist and rest your thumb on it like you're giving a lazy thumb's-up. Extend your arm out all the way in front of you and make sure the pencil is perpendicular to the line between you and the reference, like you're laying it on a window that's between you and the reference.
 Why all the way? So that whenever you measure, you know your pencil will be the same distance from your eyes.
Line up one end of the thing you're measuring with a reference point on the pencil (like the bottom of the shiny eraser holder on a regular pencil, or the top of the clip on a mechanical pencil) and slide your thumb along the pencil until the tip of it lines up with the other end of the thing you're measuring.
 Steady, steady...
Now, keeping your thumb where it is, move your arm so that the same reference point on your pencil lines up with one side of the other thing you're measuring, and look to see where your thumb ends up. This will tell you how much bigger or smaller that thing is supposed to be, proportionally. Then, when you are drawing, you can use the same method to check the proportions on your own piece!
What should my proportions be?

To be honest, I don't have many hard-and-fast rules like Living_Dead has or suddenlyponies lays out in his/her tutorial. But for starting proportions for a standing pony, I generally lightly sketch a circle for the head, plan for the body to be about 2/3 the height of the head, and for the legs to be as tall as the head. Oh, and for the top of the rump to line up at about the same height as the bottom of the chin, for the tail to be ginormous and for the hair to go out further than I expect. Everything else I tend to measure out. As you sketch more ponies, you'll get a feel for how big ears are, where they go, how much the muzzle should stick out, how rounded the rump is, and so on.
How to check angles and lines
Compared to measuring and comparing, this one is pretty simple. Pick a point on your reference. Hold out your pencil in the same way as described above, but make sure it is vertical (or horizontal). Take a look at your reference and see what your chosen point lines up with. Now go to your drawing and see if those things line up on your drawing. Do this over and over with many different points. Personally, I find this really useful to see how the legs line up with the head, how low tails go, and how far out hair ends up. (Pony hair is really poofy.)
 POOF!
POOF!You can also pick two points in the reference and use the pencil to investigate the angle between them, to help you beat the human urge to horizontalize/verticalize things. I also find that this, combined with the measurement technique, helps me draw curves, especially with hair. I'll draw a dot at the start and end of where a curve should be using angle measurement to get the angle right, and then I'll use the pencil as a baseline to see how much of a curve it is.
 I'm only here because this paragraph mentions viwrastupr.
One technique that I've seen viwrastupr use on his stream, which is pretty useful if you're sketching digitally, requires you to have the reference and the piece up on the screen simultaneously. (For the previous techniques, I find it best to full-screen the reference.) If you have a curve you need to draw, hover your stylus over that curve in the reference and practice going over the curve a few times. That should give you a little kinesthetic memory to draw the curve on your piece if you do it right afterward. This technique is adaptable to drawing traditional art, though it's a somewhat lossy adaptation.
What's an undersketch, and why should I draw one?
An undersketch is… oh gods, how do you describe an undersketch?
Okay, so.
 Here's the Earth...
Ponies are made out of circles, mostly. Circles and legs. You can see this in the top left corner of the Holy Pony Anatomy Guide (we call it that around here because it gets posted all the time):
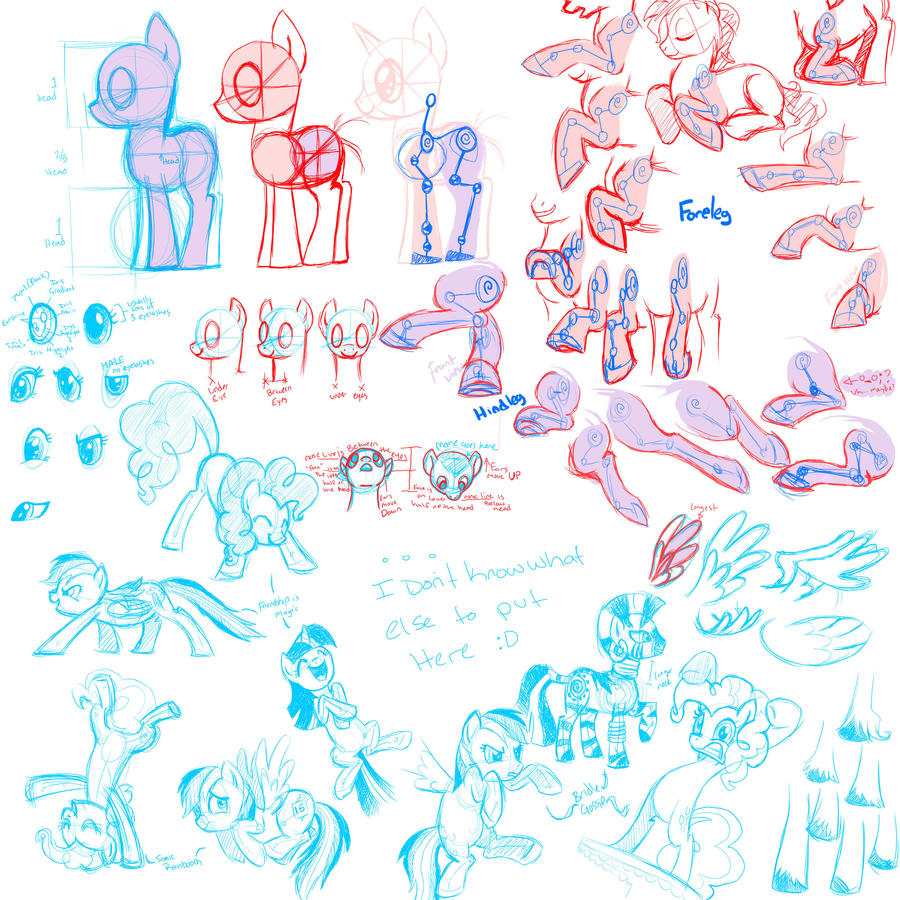
When you are laying out your drawing, laying out those circles and the skeleton for the legs helps you correct proportion mistakes, so you can move on to more detail.
 Time for some examples!
Here is an undersketch from Almost_Awesome, who often posts his. Here is another, though this is a little further along than what I'm talking about.
And here is one that shows alignment lines and stuff drawn on it:
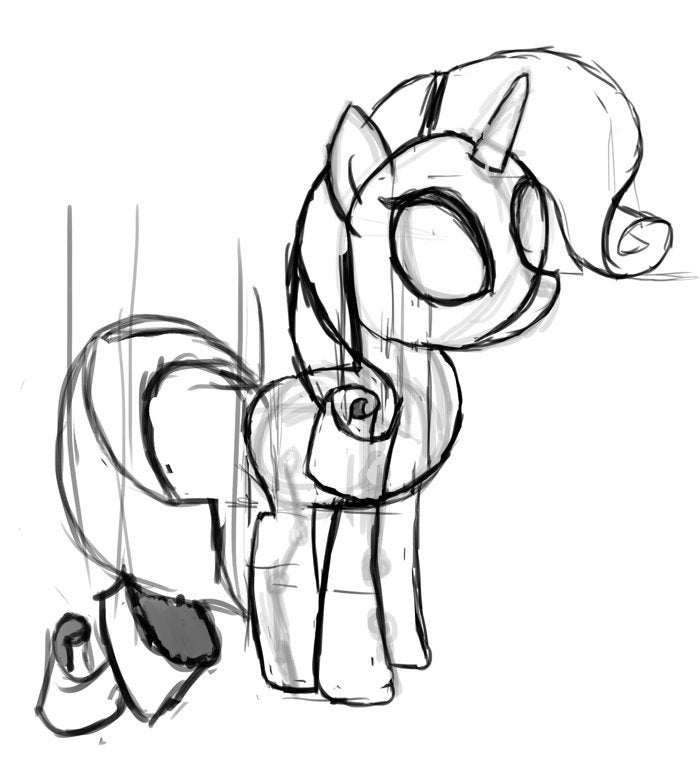
As you can see, they aren't detailed or even intended to be finished. They just lay out the shape of the pony and the placement of the eyes and so on so that you can make enough measurements to correct proportion and start to have the pony take shape.

Many first-timers go straight for the outline only. Don't do this. The important switch to make is to think about the structure and form of the whole pony, instead of trying to find where the outlines are. When you make the ribcage circle and rump/flank circle of the pony and they are of the right size, the outline will fit neatly around it. The outline comes from the volume of the pony; if you start with the outline, you'll never get a sense of body to put in it.
On the mechanics of sketching

This might stray into "personal preference" territory, but I generally do my sketches with pencil and paper (a 9x12 sketchbook, never printer paper) and then scan them in before I ink digitally. I find that it's easier for me to trust my arm when I am working on the sketchbook instead of on my 7-inch tablet. I am going through a lot of erasers this way but it's worth it. This approach might help you too.

Speaking of erasers, this is something that has been said before, but it bears repeating: your first attempt will not be perfect. That's why God invented erasers - digital or physical. Erase, redraw, erase, tweak, erase, redo. And it's also why we are here. Keep posting ponies! We'll keep critiquing them. Don't get discouraged at your feedback; get determined. Ask questions. Jump on the livestreams. Live the dream!
How to get long, smooth, beautiful curves

Something that crops up in many beginners' drawings that involve lots of curves (and what pony drawing doesn't?) is a tendency to form the curve from a lot of short, straight lines instead of longer curves. You should push yourself to get away from this. You don't have to do each curve in one long perfect beautiful line - not even when you eventually get to inking! But you will want to train your brain to trust your arm to do longer lines. (I still have to remind myself of this. I'm prone to doing short straight lines instead of curves too, though I'm getting better.) I have found that doing blind contour studies really helped me get comfortable with how my arm moves, even though I always hated doing them.
I know this is a giant wall of text, but all the stuff that's here is important (except the jokes and asides) and it's stuff that might not ever get mentioned to you. I've even put some emotes in to help break it up and bolded the key points, but you shouldn't skim this. I hope this guide proves useful to at least a few people.